Senior Design: Composting Co
This is a semester-long course where a group of mechanical engineering students design a product for a client. My group will be designing an odorless, long-term, and efficient composter to be used by the university and surrounding businesses.
We are partnering with Tufts Health Sciences campus and the Tufts Eco Reps. The current composting system at Tufts is not very efficient or functional - the compost collectors have to be emptied before they're full due to odor and pests. This discourages students from using the bins, and makes maintenance much harder for the Eco Reps. Our goal is to create a system that can store compost for long periods of time without any odor and with very minimum maintenance. We hope to promote composting habits throughout campus, and ultimately pave the way for more composting to occur on campus, instead of with third party organizations.
For our detailed notes during this process, visit our Notions page!


Discovery and Research
After choosing our project idea - some kind of compost collector - we needed to narrow down our topic and decide our problem statement. We started by brainstorming about the needs and desires of the various stakeholders involved in this issue. We discussed the social, economic, and technical context in which our product would function, to better understand what was required of our product.
Once we had a better idea of what else existed and the major players in our issue, it was time to actually talk to them. We first interviewed our client, Theresa Delucia at the Tufts Nutritional School, to discuss the direction she was hoping this project would take. We then met with the Tufts Eco Reps, who would be a potential user of our product. Finally, we interviewed the president of the Tufts Student Garden club. These various stakeholders explained their experience with the current compost system and areas that could use improvement. These conversations gave us a much better understanding of what the actual issues were, and the niche that our product could occupy.
From our research and interviews, it was clear that we had a few major choices to make about our design. We needed to decide what our product would do, who it would be for, where it would exist, and the scope of our project.
The first decision was whether our system would focus on composting food waste as fast as possible, or on collecting and storing food waste as long as possible. These two choices at conflicting goals: either encourage fast decomposition, or try to slow down the process to prevent the food from composting and smelling. We decided that although decomposition may be more interesting to solve, collection was needed more by the community and would be more feasible. We then had to think about who we were building this for - individuals, students in dorms or off-campus, or the campus as a whole. We saw the biggest gap in the campus system, so a bin system located in campus buildings was finalized.
Our final problem statement reflected theses choices:
Our system we create will offer an odorless, long term, and tidy way to collect compost, which will encourage students and faculty to use the campus compost systems more frequently.
Project Summary
Project Planning
Once we had our problem definition decided, we needed to plan out the rest of the semester, to ensure that we would stay on track. To do this, we first made a mind-map to brainstorm the different tasks required of us. Then, we created a Gantt Chart. We noted the tasks that were dependent on previous tasks, as well as the tasks that we could start at any point.


Product Definition
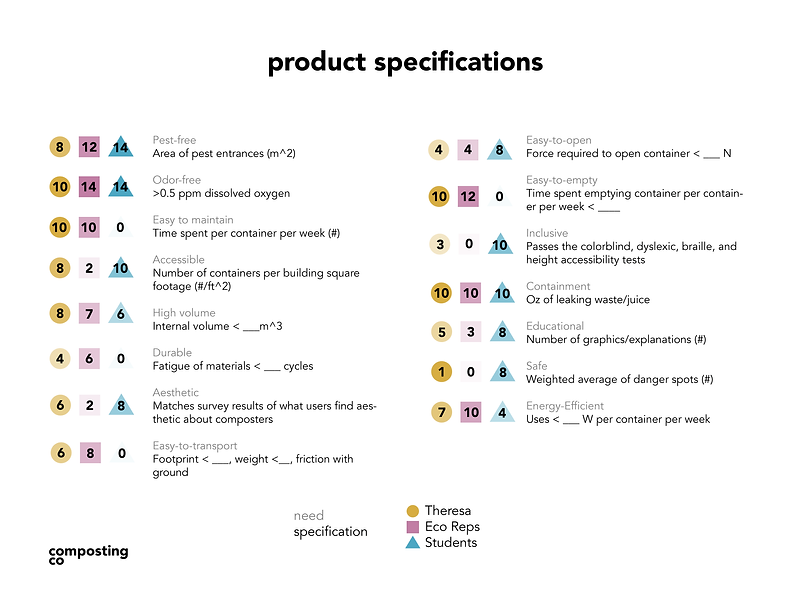
Once we had defined our problem, and understood it’s context in society and technological advances, it was time to specify the constraints for our product. We brainstormed the different needs of Theresa, our client, the Eco Reps, and the Tufts student body. Then, we ranked the importance of each need out of 100 for each of these stakeholders. As can be seen below, our final list of needs were a food waste collector that was pest-free, odor-free, easy to maintain, accessible, capable of high volume containment, durable, aesthetic, easy to transport, easy to open, easy to empty, inclusive, and able to contain all waste without leaking.
This is a detailed list of our desires for our product, but doesn’t tell us much in terms of actual engineering design. There are many ways to make something ‘easy to open’, and not all of them would be appropriate for this application. Therefore, we needed to assign product specifications to each need. This would help turn qualitative desires into quantitative constraints. Each spec needed to provide an actual way of measuring how well a product meets the constraint, using actual numbers and units, but shouldn’t be so specific that it limits our creativity in solutions. We wanted to have more structure for manufacturing, but we didn’t want to box ourselves in due to too narrow specs
Concept Generation
After we defined specific constraints for our product, it was time to actually brainstorm potential solutions. Up until this point, we were careful not to picture any actual design – we wanted to leave ourselves open to as many concepts as possible. The first phase in our group’s concept generation was a Set A list of concepts. Set A is inclusive of any and all ideas – nothing gets erased, and anything goes. We brainstormed individually for five minutes, and then came back together to share ideas. Taking turns, we each drew our ideas on a whiteboard. Often, one aspect of a concept would inspire several completely new ideas, and we soon filled an entire board with concepts.
Next, we focused on narrowing our Set A into Set B. Our Set B list should be a little more realistic – this is where we filter out any improbable ideas. We wrote all of our user design needs on a white board and sorted each idea into the category it best fulfilled. This allowed us to visually see where our ideas were concentrated, and helped us understand the overlap between ideas. We noticed that most of our ideas were about specific components, not the entire product. For example, we had concepts like “filter on air inlet”, “compression system”, or “heating element”. In a way, this made it easier to evaluate each idea because we could focus on the function of that specific subsystem, and were able to then mix-and-match features for our final ideas. To help us make the necessary cuts, we utilized a morphological chart. This is a method of ranking each design by how well it satisfies our design constraints. It’s a great way to make sure we’re on the right path and focusing on the correct features. It can also be very helpful for ‘grading’ each concept. The morphological chart takes into account both the specific needs, but also how important each need is to us. We ranked our ideas, and then came up with 10 final designs that each combined several of our ideas.

We each chose two of these ideas and sketched them out. It can be easy to assume everyone interprets a design the same way, but when sharing our sketches, it was clear that we each visualized them differently. This process really helped us understand how we might physically manufacture a design, and what it would mean to actually produce it. It's easy enough to say "we'll compress the compost," but there's many different ways to do that. As we shared our sketches, we discussed the potential advantages and disadvantages of each idea, and how well they met our design needs. Seeing the sketches in front of us really helped to compare each system, and would be very useful when creating our Set C list.


The next step was to further concentrate our ideas into a Set C. This is a list of 5 feasible ideas that we’ll explore further. We were still struggling with what the best method would be: try to speed up the process to decompose as fast as possible, or slow the process down to reduce odor? From our discussion with our client, we decided that slowing down the decomposition process would ultimately fulfill our needs best - we could ensure no odor with achieving high volume storage in other ways. With this decided, we returned to our Set B list to eliminate heating, shredding, and bacteria, since they wouldn't prolong decomposition. Worms would be too complicated and messy, and mixing or a spiral compression system would be too logistically challenging for cleaning/emptying. With these choices made, we now had our Set C list - designs we would flesh out more and use to determine our final design.
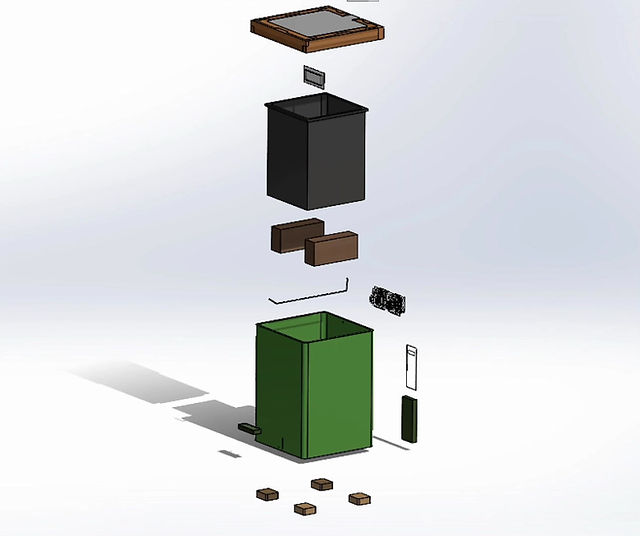
With our Set C list made, it was now time to CAD each of them. Creating computer models would help us understand how to manufacture each idea. We had to come up with specific mechanisms, and think through every step of making this product.


After we had our CAD designs, it was time to narrow our Set C into our final design. First, we met with our sponsor, Theresa, to get a critique on our current designs. Theresa was interested in our designs, but stressed the need for a simple design that would be straightforward to use and easy to maintain. We agreed that our goal was to improve the user experience, so a simple mechanism would be best. However, we would still be able to implement sophistication, particularly in the lid. We chose cooling as our main prevention method, with a double wall and heavy lid to provide insulation. We also wanted to make a foot-pedal, as well as sensors that could report the temperature and humidity of the inside bin. Ultimately, we had to redesign the lid several times to accommodate for different machining techniques. We also had a particular aesthetic in mind - we wanted a green and wood look.


Throughout this concept generation process, communication was critical. Our group had to be on the same page with our interests and expectations for this project. We wanted to ensure that each group member felt heard and had a chance to contribute, and that our final design was something we actually wanted to build. Some of us were more interested in electronics, while others wanted to focus on the CAD or physical manufacturing. At the beginning of every meeting, we would do a check in and make sure there wasn’t anything specific someone wanted to address. At every step, we made sure to discuss how we felt about the concepts. While its true that the goal of this whole process is to create a product that meets our constraints, it’s also important to enjoy this class and spend time doing what we were enjoyed. There were a couple times where we had an idea that could potentially work, but none of us were excited about doing it, so we let it go. In an actual start-up or company, this wouldn’t be acceptable. But we’re students and wanted to get as much out of the course as possible, so it was a reasonable consideration for us.
Product Development
With our final design in hand, it was time to get building! We finalized our initial CAD model and began searching for the actual components we would us. We had a budget of $80 per person. With a group of 5, this came to $400. Before we did anything, we returned to our Gantt Chart to plan for the remaining time in the semester. We only had from Nov 4 to Dec 6 - 4 weeks excluding Thanksgiving break - to build our product, so we had to be as efficient as possible. To be help this, we wanted to purchase as many parts as possible, and custom make the few we couldn’t buy. We identified five main subassemblies: the bins themselves, the lid, the cooling system, an opening mechanism, and the sensing elements. We each chose two of these subassemblies we wanted to focus on. While we were all eager to help with each part, the reality was that we only had so much time, and it was more efficient to delegate work. Personally, I focused on the cooling system and sensing elements, as well as the bin layout. In the end, we all also spent quite a bit of time manufacturing the lid.
Bins: We decided to purchase bins instead of manufacturing them, as to save time and efficiency. We needed the bins to fit inside one another, with enough space for insulation between them, but still be about the size of a normal trash can. We found two bins with good dimensions and bought them off a restaurant website. We then cut some wood pieces with the tablesaw to keep the inner bin elevated, and to keep the outer bin off of the floor. We coated these pieces with waterproof and heat proof sealant, and coated the inside of the bins with a heat proof spray paint.
Lid: The lid was our most complicated component. We needed something that would create a tight seal, be relatively air-proof, hold charcoal packets, and be easy to maintain. So we needed something that fit tightly over the lid and bag, but was able to be removed in order to remove the compost and change the bags. Originally, we wanted to vacuum form our lid with thin HDPE. We redesigned our lid to have uniform thickness and drafting for easy removal. However, the vacuum forming table was too small for our purposes. We then considered milling the lid out of HDPE, but that proved to be much too expensive. We then turned to wood, but it turned out that the largest CNC mill would also be too small to do it in one piece. Instead, we would have to make the lid out of multiple pieces. The largest piece could only be 22 inches, so we had to make our lid out of 13 individual wood cuts. We redesigned the lid to make them fit together like puzzle pieces, with a removable section and a permanent section attached to the top lid. We also made sure that the edges that needed it were filleted so that the mill could actually cut it. It took us some time to figure out how to use the CNC mill, and the right settings for getting a quick but high resolution cut. Once we finally had all the parts, we sanded them down, fit them together, glued them, filled in any empty spots, and gave it a major sanding. Then, we varnished it and applied a waterproof and heat proof sealant. We also added gaskets and magnets on the inside so that there would be a tight seal with the top. The top lid was made from one piece of MDF, with a section milled out to fit the charcoal and bamboo packets.
Cooling system: We originally planned to take the cooling system from a fridge we got for free. Buying a compressor and brazing the pipes would have been much too expensive. We did a teardown of the fridge, cataloguing each piece so we understood how it worked. Once we had a functioning cooling system, we planned to install it underneath the bin and place the tubes in the space between the two bins. However, some of the pipes got cinched and we were concerned about potential tearing. We reinforced these sections, but too much handling caused a small leak. We had to contain the refrigerant and deliver it to hazardous waste, so it was no longer an option. We considered getting another fridge, but decided we likely would run into the same problem. With only two weeks until the final showcase, we decided to purchase a Peltier cooling system - a small Peltier chip that produces cold on one side and heat on the other. Either side was attached to large heat sinks and fans - blowing the cold in and the heat away. This system was capable of reaching freezing, though we were only interesting in cooling the interior. We wired it, soldered the necessary parts, and bought a power supply for it. Then we modified our bins so the cooler would provide cool air to the inside bin.
Opening mechanism: Our original design was to implement a footpedal. We created a design that wouldn't interfere with our cooling system, and would push up on the hinge connected to the lid. After an unsettling amount of trig, we had a design that would give us the necessary height. We bent it using a metal bending machine, and waterjet cut runners and a pedal. However, once it was made, we realized that the MDF lid would be too heavy to lift. While the concept was sound and the mechanism moved as hoped, we couldn't provide enough torque to lift the lid. We considered adding a counterweight or a different hinge, but it was only a couple days until the showcase, so we ended up installing a simple and sleek handle.
Sensing elements: We added a sensor for temperature and humidity, using a Raspberry Pi and an SHT 81 sensor. We soldered the sensor and programmed it to report the temperature and humidity every five seconds. The ultimate goal was to upload this information to a website using wireless connection. However, our Raspberry Pi was unable to utilize Flask, the application for sending information to a website URL. In the end, we had to have it simply send the information to the Raspberry Pi terminal. This is an issue that can be easily fixed in the future with a different Raspberry Pi. The idea is that if there were multiple bins on campus, facilities could simply check a website and ensure that the conditions inside were acceptable. In the future, we would also want to add a light sensor that could help us track capacity.


Presentation
To the final showcase! The building time flew by, and soon enough the semester came to a close and it was time to present our final product. Our whole class showcased our products in the Engineering Atrium, where our clients, professors, and fellow classmates were invited. To prepare, we talked in detail about what we wanted to highlight about our product, and how to give a compelling but educational elevator pitch. We had a practice run to refine our pitches - an important lesson for us was knowing when to limit the explanation in favor of letting the viewer ask questions. Ideally, we could give a short intro and then explain the deeper concepts if a question is asked pertaining to them. The day of the showcase, we set up our bin, brought out our extra Peltier cooler and charcoal bags for demonstration purposes, and printed out our poster. Aditi produced a beautiful poster with graphics of our design problem and solution, which can be seen below.


Lesson Learned
I enjoyed my senior design project, and feel that my group performed admirably. Though there were some frustrations, we were really happy with our final result. Theresa was also pleased with our final product, and said that she really liked the aesthetics of it, and thought that it would definitely be an improvement on the current system.
Overall, our design process went well. We had a great brainstorming and design phase - we came up with a wide variety of solutions and generated many ideas. We learned a lot when altering our design as we built it - the lid in particular took a lot of rethinking. The size was too large for any of the machines in Nolop or Bray, so we had to construct it from 13 different pieces of wood. This was very time consuming and required multiple redesigns, but it came out really well. We also worked really hard on our foot pedal, which worked mechanically but was not functional due to the weight of the lid. If we had more time, it would have been nice to try and redesign the lid so it could be lighter and have a counterweight. Our electrical system was also pretty good - our cooling was functional and our sensors worked.
There were definitely quite a few lessons learned during this project. At every stage, something went wrong and we had to troubleshoot. At times, it seemed like what we thought were the easiest steps became huge challenges. But we had great team communication, so we were able to make it through a number of setbacks - like our cooler coming really late, or the lid needing a full redesign. Our team worked seamlessly together - I'm really grateful I had as good a team as I did. Because we were close even before this project, we knew how each of us worked and how to be a team player. This helped us address issues before they happened, and made sure everyone felt satisfied with the direction our project was going in. It was also a good lesson to design for manufacturing and assembly. We had to think hard about how we wanted everything to fit together so we could continue to modify and debug parts of the bin, while still getting it assembled correctly. It was also great to work with so many machines. We got to use the Shopbot, the XCarve, the waterjet cutter, lasercutter, 3D printer, tablesaw, circular saw, sander, and the metal bender. It was fun to see all of those in action and decide which was the right tool for the job. We also learned that it’s better to start simple and get more sophisticated. We started with a pretty sophisticated design with lots of interesting add-ons. As our project moved forwards, we had to trim down our design significantly, which was fine but at times a little demoralizing. Another interesting lesson was how much aesthetics matter. Throughout the project, we decided a focus on aesthetics was a lower priority than the system itself. But during our showcase, even though a few mechanisms didn't work exactly as planned, everyone commented on how good our product looked. Because it looked professional, people didn't see blemishes in function as easily. Overall, we learned a lot about the design process, manufacturing, and working in teams for engineering.

